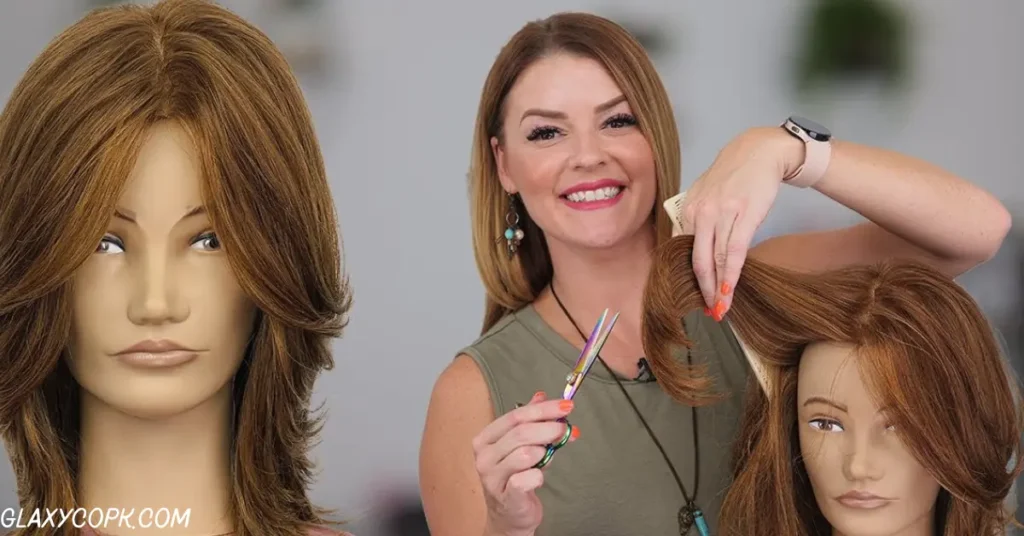
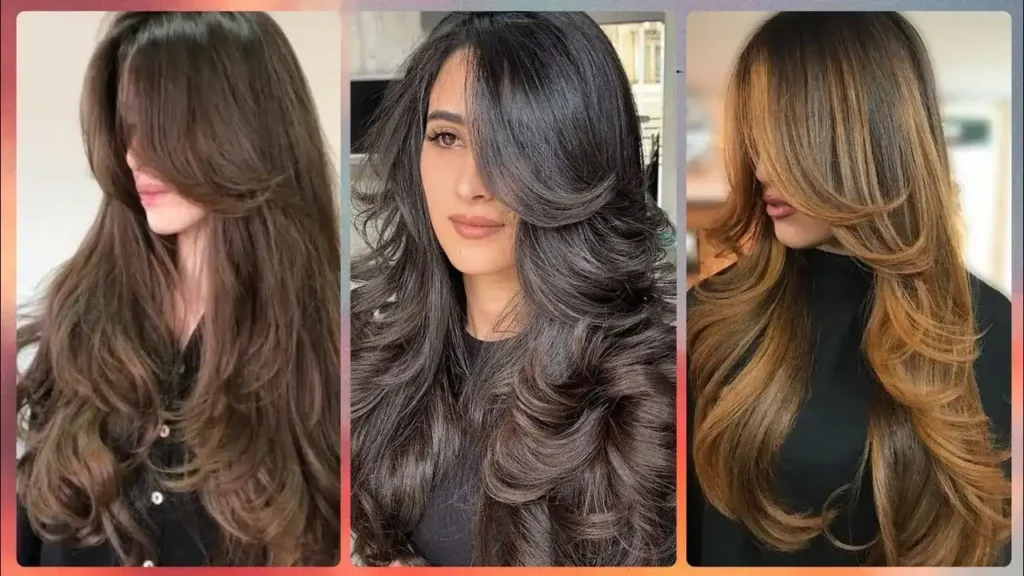
That trendy butterfly cut you’ve been scrolling past on your feed? The one making everyone look like they just stepped out of a high-end salon? The butterfly haircut has taken over social media, and for good reason. It’s versatile, flattering and gives you that effortlessly chic vibe without looking overdone.
But what makes this cut special isn’t just the layers. It’s the strategic placement that creates volume at your crown while keeping length at the back, with face-framing pieces that move like—well, butterfly wings. And yes, you can absolutely cut a butterfly haircut at home if you’ve got the right tools, a bit of patience and a willingness to follow some straightforward techniques.
What Exactly Is a Butterfly Haircut?
Before you grab those scissors, let’s get crystal clear on what you’re actually creating. The butterfly haircut isn’t just another layered style—it’s a specific technique that creates a distinctive silhouette. Picture this: shorter, choppy layers concentrated around your face and crown, gradually blending into longer layers toward the back. When styled, these layers fan out and create movement that resembles butterfly wings in flight. Pretty poetic for a haircut, right?
Here’s what defines a proper butterfly haircut:
- Shorter crown layers that start around chin to shoulder length, creating lift and volume at the top
- Face-framing pieces that typically begin near the cheekbones or chin, drawing attention to your features
- Graduated layers that get progressively longer toward the back, maintaining overall length
- Textured ends achieved through point cutting or thinning shears, giving that feathered, airy finish
- Natural blending between sections—no harsh lines or choppy disconnections
The beauty of cutting a butterfly haircut at home lies in its forgiving nature. Those textured, piece-y layers actually hide minor imperfections better than blunt cuts. Plus, the style works across various hair types and face shapes with small modifications.
Visual Inspiration for Your At-Home Butterfly Cut
Before making that first snip, spend time gathering visual references. This isn’t just about finding a pretty picture—it’s about understanding the specific variation you want to recreate. Sabrina Carpenter’s butterfly cut leans shorter with more dramatic face-framing, while other iterations maintain longer overall length with subtle layering.
Here’s a breakdown of popular butterfly haircut variations you can try at home:
| Butterfly Cut Variation | Best For | Key Characteristics | Difficulty Level |
| Short Butterfly Cut | Shoulder-length or shorter hair | Layers start at ear level, maximum volume | Beginner-Friendly |
| Long Butterfly Haircut | Mid-back to waist-length hair | Subtle layers, maintains length | Intermediate |
| Butterfly with Curtain Bangs | Those wanting face-framing + fringe | Combines two trending styles | Intermediate |
| Textured Butterfly Cut | Thick or coarse hair types | Heavy use of thinning shears | Advanced |
| Curly Butterfly Layers | Wavy to curly hair textures | Dry cutting technique required | Advanced |
Essential Tools You’ll Need to Cut a Butterfly Haircut at Home
Must-Have Cutting Tools
Here’s your non-negotiable shopping list for cutting a butterfly haircut at home:
Professional Hair Cutting Scissors ($20-60) These aren’t just sharper than regular scissors—they’re designed with specific blade angles that slice through hair cleanly. You want scissors between 5.5 to 6.5 inches for cutting your own hair. Shorter blades give you more control. Look for stainless steel with a tension screw you can adjust. Brands like Equinox, ULG, and Jaguar make solid entry-level options. If you’re serious about maintaining your butterfly cut long-term, spending $40-50 gets you scissors that’ll last years with proper care.
Sectioning Clips (4-8 clips, $8-15) Those butterfly clips from the dollar store won’t cut it here (pun intended). You need clips that actually grip your hair securely without slipping. Alligator clips or duckbill clips work best. Get at least six—trust me, you’ll use them all. Different colored clips help you remember which section is which, especially when you’re following along with a tutorial.
Fine-Tooth Comb ($5-12) A professional cutting comb with closely spaced teeth on one end and wider teeth on the other gives you precision. The fine teeth create clean partings for sectioning, while wider teeth detangle without pulling. Carbon or heat-resistant combs are worth the extra few dollars since they’re more durable.
Spray Bottle ($5-10) Your hair needs to stay consistently damp (not soaking wet) throughout the cutting process. A continuous mist spray bottle from the beauty supply store works better than those dollar store versions that spray in random directions.
Hair Ties or Elastics ($5) Not all elastics are created equal for cutting. You want seamless bands that won’t create ridges or dents in your hair. If you’re using the ponytail method for cutting butterfly layers, that elastic placement determines your entire cut.
Mirror Setup ($0-50) You absolutely need to see what you’re doing from multiple angles. A large wall or countertop mirror as your main view plus a handheld mirror for checking the back is minimum. Some people invest in a tri-fold mirror or position two mirrors at angles—whatever helps you see all sections clearly.
Optional But Helpful Items
A cutting cape or old towel keeps hair off your clothes and makes cleanup easier. Those tiny hair clippings get everywhere and itch like crazy. A razor or razor comb creates even more texture if you want that extremely feathered look, though it’s trickier to control. Hair level guides or a clear ruler help ensure your layers are even on both sides—particularly useful for perfectionists. And honestly? Having your phone or tablet propped up with a tutorial video playing is almost essential your first time attempting this cut at home.
Preparing Your Hair Before Cutting the Butterfly Haircut
Wash and Prep Your Hair Properly
Wash your hair with your regular shampoo and conditioner. Skip heavy masks or leave-in treatments today—you want hair in its normal state. Gently squeeze out excess water with a towel. Don’t rub vigorously; you’re not trying to dry it, just remove the dripping wetness. Your hair should feel cool and slightly moist to the touch, not cold and saturated.
Detangling comes next, and it’s not negotiable. Work through your hair with a wide-tooth comb or detangling brush, starting from the ends and working toward roots. Every single tangle and knot needs to go. Why? Because tangles create resistance that pulls sections in different directions, leading to uneven cuts. You think you’re cutting a straight line, but that hidden tangle shifts everything. Spend the extra five minutes here—it prevents hours of frustration later.
Choosing Your Butterfly Haircut Length
Before cutting anything, you need a game plan. Stand in front of your mirror and assess your starting point. How long is your hair right now? Where do you want those face-framing pieces to hit—chin, jawline, collarbone? What about the shortest crown layers—shoulder length, or more dramatic at ear level?
Here’s a helpful framework for planning your DIY butterfly haircut:
- Conservative approach: Keep face-framing pieces at chin length or longer, crown layers at shoulder length. Remove only 2-3 inches from your longest hair. This gives you the butterfly effect while maintaining plenty of length if you’re nervous about going shorter.
- Moderate butterfly cut: Face-framing starts at jawline to mid-neck, crown layers hit mid-neck to shoulder. You’re removing 3-5 inches, creating more noticeable dimension and movement.
- Dramatic transformation: Face-framing pieces at cheekbone or chin level, crown layers at ear to chin length. Removing 5+ inches from longest sections. This creates the most volume and statement-making shape but requires confidence and precision.
Setting Up Your Cutting Station at Home
Your environment matters more than you’d think. I’ve seen too many DIY butterfly haircut attempts go sideways because someone tried cutting in a dim bathroom with one small mirror. Let’s create a setup that sets you up for success.
How to Cut a Butterfly Haircut at Home
Step 1 – Section Your Hair for the Butterfly Cut
Proper sectioning is the difference between “Did you get that cut at a salon?” and “Oh… did you cut that yourself?” Skipping or rushing this step creates uneven layers that are a nightmare to fix. Take your time here.
Start by creating a horseshoe section at the front. Part your hair from the highest point of one eyebrow, over the top of your head, to the highest point of your other eyebrow. This creates a U or horseshoe shape. Clip this front section away—it contains your face-framing pieces and will be cut last.
Next, section the back. Create a horizontal part from the top of one ear, across the back of your head, to the top of your other ear. This divides your hair into upper and lower back sections. The upper section typically contains the crown area where you’ll create volume through shorter layers. The lower section maintains length.
Now tackle the sides. From each ear, create diagonal partings that angle back toward your crown. These side sections transition between your face-framing pieces and your back layers. Getting these right ensures you don’t end up with weird gaps or disconnected chunks.
You should have six main sections when done properly:
- Front horseshoe section (face-framing)
- Left side section
- Right side section
- Upper back/crown section
- Lower back section (sometimes divided into left and right)
- Nape/underneath layer
Step 2 – Cut the Face-Framing Butterfly Layers
These are the money pieces—the sections that define your butterfly cut and frame your face. They’re also the most visible, so we’re approaching them with patience and precision.
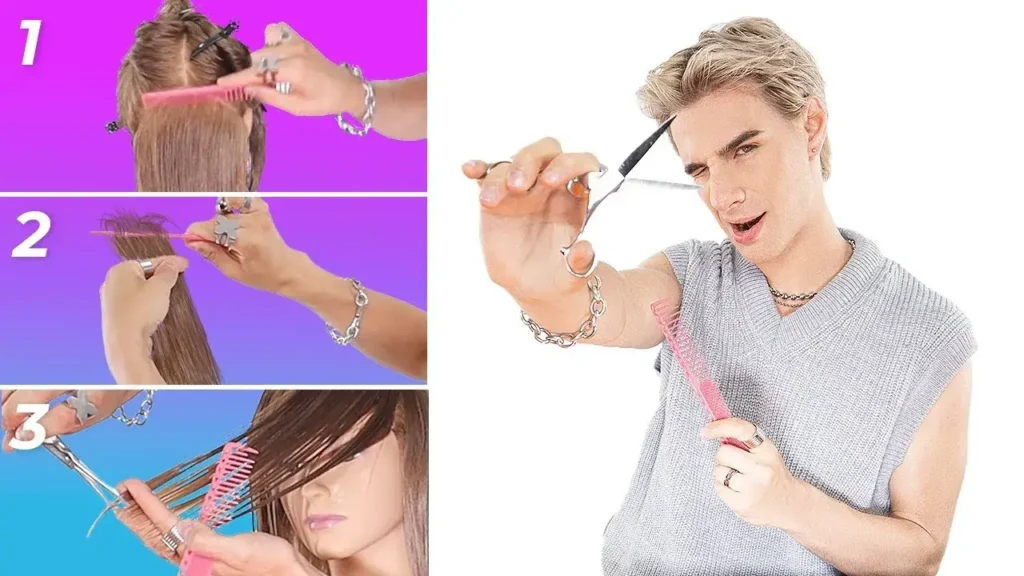
Start with your horseshoe section still clipped up. Release just the very front pieces—think a triangle section at your forehead that’s about 1-2 inches wide at your hairline. Leave the rest of the horseshoe clipped for now.
The twist-and-cut method works beautifully for face-framing layers:
- Comb this front section straight down over your face. Make sure it’s smooth and tangle-free.
- Decide where you want this shortest layer to hit. Remember: go longer than you think. You can always cut more.
- Pull the section straight forward (toward your nose), not down. This is crucial—the angle matters.
- Twist the section loosely a few times. This creates a slight graduation so the cut isn’t blunt.
- Hold the twisted section between your index and middle fingers, sliding your fingers down to where you want to cut.
- Using your hair cutting scissors, make small upward snips into the hair below your fingers. This is called point cutting—cutting into the ends at an angle rather than straight across. It creates texture and prevents that blunt, DIY look.
Creating symmetry challenges even experienced stylists. Here’s the technique:
- Cut one side first, let’s say your right side.
- When you’re happy with it, pull both sides forward over your shoulders.
- Hold them together in front of you, tips aligned.
- Look in the mirror. Are they the same length? If one side is longer, carefully trim to match.
- Double-check by releasing both sides and looking straight ahead. They should mirror each other.
The most common mistake at this stage? Cutting too short in a moment of enthusiasm, then trying to “fix it” by cutting the other side shorter, which leads to cutting the first side again, spiraling into shorter and shorter face-framing until you’re left with pieces that hit your cheekbones when you wanted chin-length.
Step 3 – Create the Crown Volume Layers
The crown section gives butterfly haircuts their signature lift and volume. This is where the magic happens—where flat hair transforms into dimensional, touchable texture.
Release your upper back/crown section while keeping everything else clipped away. This section runs from the top of your head back to roughly where your head starts to curve down toward the nape. It’s a fairly large section, so work in subsections if you have thick hair.
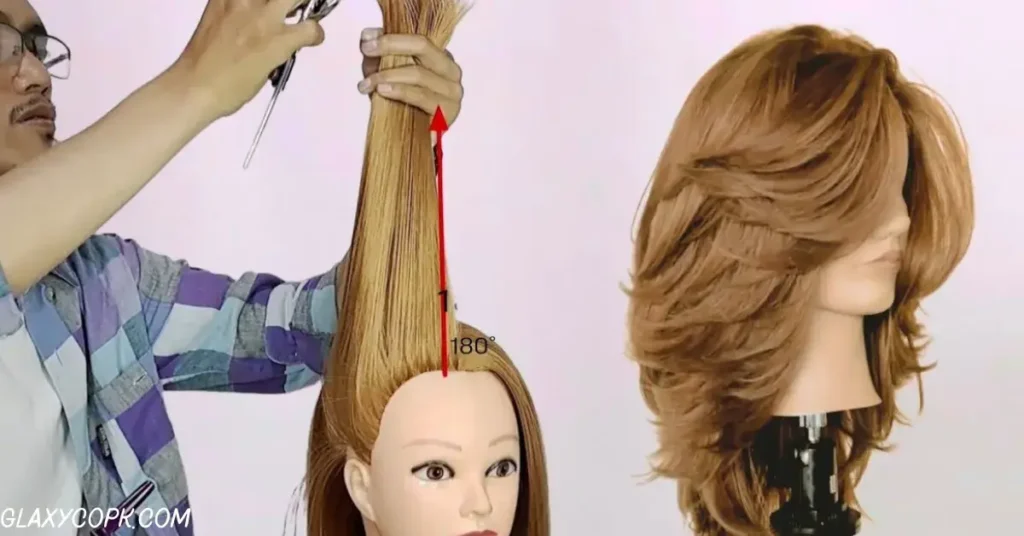
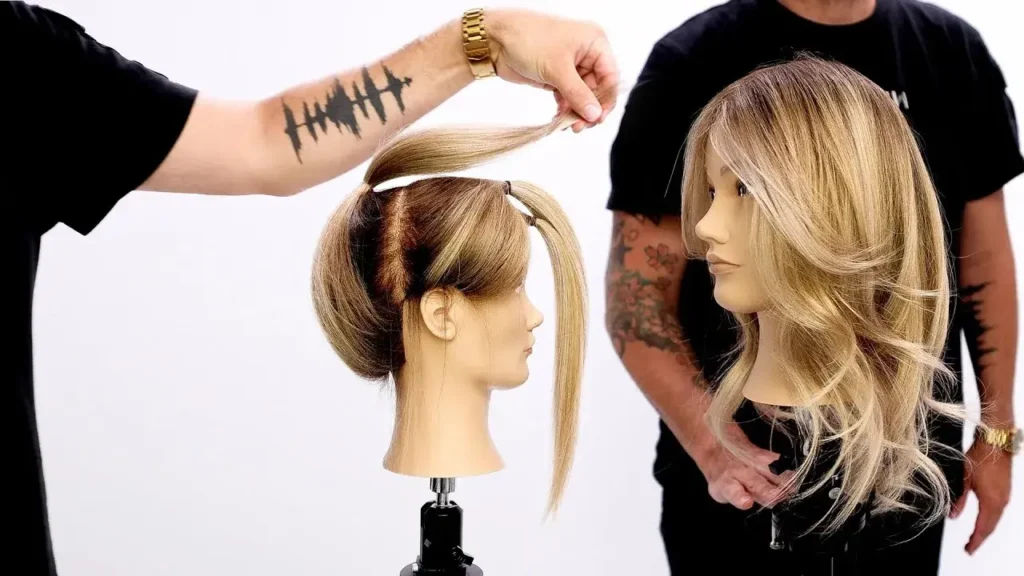
The ponytail method is beginner-friendly and surprisingly effective:
- Gather your crown section and comb it straight up toward the ceiling.
- Secure it with an elastic at the very top of your head. The ponytail should stick straight up like a unicorn horn.
- Slide the elastic down the ponytail to where you want to cut. For moderate volume, position it about 4-5 inches from the base. For dramatic lift, go 2-3 inches.
- Hold the ponytail straight up with one hand, keeping tension.
- With your scissors in the other hand, cut straight across just above the elastic.
- Remove the elastic and let the hair fall. Those cut pieces become your crown layers.
This method works because when you pull hair straight up and cut it, then let it fall naturally, you’ve created layers that radiate from the top of your head outward. The pieces closest to your crown are shortest, gradually getting longer toward the perimeter.
- Subtle volume: Remove 2-3 inches from your crown layers
- Moderate volume: Remove 4-5 inches
- Maximum volume: Remove 5-7 inches (bold move, but stunning results)
After cutting, ruffle your crown area with your fingers. Do you see layers? Do they create lift? If the section still looks heavy or flat, you can take a bit more length. But again—start conservative. Crown layers that are too short stick straight up when dry, creating that unfortunate “rooster tail” effect.
Step 4 – Blend the Middle and Back Sections
You’ve got face-framing pieces and crown layers. Now comes the challenge: making everything connect seamlessly so your butterfly haircut looks intentional rather than choppy.
Release one of your side sections. This hair needs to transition between your shorter face-framing and your longer back length. Think of it as a bridge—too short and you get a disconnected gap, too long and you lose the layered effect.
The blending technique:
- Take a thin vertical subsection from your side section, about half an inch wide.
- Include a tiny bit of your already-cut face-framing as a guide (this is called a traveling guide).
- Pull both pieces forward at a 45-degree angle from your head.
- Cut the new section to match the guide section’s length, using point cutting.
- Move to the next vertical subsection, again including a bit of the section you just cut as your guide.
- Continue working back until you’ve blended the entire side section.
Elevation angle matters tremendously here. Pulling hair at different angles creates different layer lengths:
- 0 degrees (pulling straight down): Creates the least amount of layering, more weight
- 45 degrees (pulling diagonally up/out): Moderate layering, good for blending
- 90 degrees (pulling straight up/out): Maximum layering, removes most weight
Step 5 – Add Texture with Thinning Shears
Your layers are cut. The shape is there. But if you stop now, your butterfly haircut might look nice but won’t have that lived-in, effortlessly cool texture that makes people do a double-take. Thinning shears are your secret weapon for transforming a good cut into a great one.
Where to use thinning shears in butterfly haircuts:
First, focus on the ends. Take small sections (about one inch wide) and close your thinning shears on the hair about 2-3 inches from the ends. Open, move down an inch, close again. You’re creating tiny gaps in the hair that reduce bulk and create that feathered, piece-y look. Do this throughout all your layers—face-framing pieces, crown layers, side sections.
Next, address any areas that still feel heavy or bulky. For most people, this is the area between the crown and the perimeter, where hair tends to clump together. Take vertical sections and use your thinning shears on the mid-lengths—not at the roots (you’ll create weird short pieces that stick out) and not at the very tips (you’ve already addressed those). This removes internal weight while maintaining length.
How many passes with thinning shears?
Here’s where restraint comes in. Each time you close the shears, you’re removing about 30-40% of the hair in that section (depending on your shears’ teeth count). One or two passes per section is typically enough. Three or more and you risk creating holes—sparse spots where you can see through to underlying hair. It looks patchy and takes months to grow out.
For different hair types:
- Fine/thin hair: Use thinning shears very sparingly, only on the ends. Over-thinning makes fine hair look stringy and emphasizes lack of density.
- Medium hair: Moderate thinning throughout. Focus on ends and a few passes through mid-lengths where needed.
- Thick/coarse hair: More aggressive thinning is fine. You can do 2-3 passes through mid-lengths and ends without creating holes.
After thinning, run your fingers through your hair. It should feel lighter, more mobile. Pick up sections and see if they separate into piece-y chunks rather than falling in one solid curtain. That’s the texture you’re after.
Step 6 – Check, Adjust, and Perfect Your Butterfly Haircut
You’ve made it through the cutting process. Don’t declare victory just yet—the checking phase catches mistakes while they’re still fixable.
First, blow dry your hair completely. Use a round brush or your fingers, whatever you’d normally use. Style it how you typically wear it. Why? Because wet hair lies differently than dry hair. Layers that looked perfect while damp might reveal uneven spots once dry. That’s fine—we’ll fix them.
Stand in front of your mirror with your handheld mirror. Check from the front, both sides, and the back. Look for:
Uneven lengths: Do your face-framing pieces match on both sides? Is one side noticeably longer? Pull sections forward and hold them together to compare.
Choppy transitions: Are there obvious lines where one layer ends and another begins? You might see this between crown layers and back sections. Blend these with a bit more point cutting or thinning.
Random pieces: Sometimes one chunk of hair escaped your sectioning and is longer than everything around it. Find these stragglers and trim them to match surrounding layers.
Bulk spots: Areas that still look heavy or clumpy need a few more passes with thinning shears.
When making adjustments, cut less than you think necessary. Dry hair often appears slightly longer than it actually is because of flyaways and static. Just trim a quarter-inch at a time, then check again.
The handheld mirror is crucial for checking the back. Hold it so you can see the back of your head reflected in your main mirror. This double-mirror technique lets you view the back clearly. Check that your crown layers are even side-to-side and that the overall shape is symmetrical.
Do a few head movements. Shake your hair side to side. Bend forward and flip your hair, then stand back up. Bounce a bit. Sounds silly, but these movements reveal how your cut behaves in real life. If something looks weird when you move, investigate.
Knowing when to stop is an art form. There’s always the temptation to “fix” one more little thing, which leads to fixing another thing, until you’ve overcorrected and created new problems. If you’ve made it through all your hair and everything looks relatively even and blended, you’re done. Don’t let perfectionism push you into overworking the cut.
Take photos of your finished butterfly haircut from multiple angles. Not just for Instagram (though go ahead and post—you earned it), but for reference. These photos help you
Different Techniques for Cutting Butterfly Haircuts at Home
The Ponytail Method for DIY Butterfly Cuts
This technique has gone viral on TikTok for good reason—it’s almost foolproof for beginners wanting to cut butterfly layers at home. The concept is simple: gather your hair, cut it in a ponytail, and when you let it fall, you’ve created layers.
Full ponytail method step-by-step:
- Brush all your hair forward over your face as smoothly as possible. No parts, no tangles.
- Secure an elastic at the very tip of your nose or just beyond. The elastic position determines where your shortest layers hit.
- Hold the ponytail firmly with one hand, keeping tension so hair doesn’t slip.
- With scissors perpendicular to the ponytail, cut straight across above the elastic. For more texture, angle your scissors slightly and point cut.
- Remove the elastic and let your hair fall naturally.
- You’ll have layers radiating from your face back, with the shortest at the crown and longest at the perimeter.
Pros of the ponytail method:
- Extremely fast—the entire cut takes 5-10 minutes
- Hard to mess up badly; even imperfect execution creates reasonable layers
- Great for adding volume to flat hair
- Minimal sectioning required
- Perfect for complete beginners
Cons of the ponytail method:
- Less precision than sectioning methods
- All layers are uniform length, which might not be the exact butterfly effect you want
- Face-framing pieces aren’t customized separately
- Back layers receive the same treatment as front, which isn’t ideal for dramatic butterfly cuts
- Harder to control final length
Best for: People with straight or slightly wavy hair, medium to long length, who want quick volume and aren’t fussy about precise layer placement. It’s also great for refreshing an existing butterfly cut between professional appointments.
YouTube tutorial recommendations: Search for “unicorn cut” or “ponytail haircut method”—both describe this technique. Channels like “Brad Mondo” and “Hair Buddha” have clear demonstrations. Watch at least two different tutorials to see slight variations in technique, then decide which approach feels right for you.
The Twist and Cut Technique
This method gives you more control than the ponytail approach, particularly for face-framing sections. It’s the technique many stylists use for creating soft, blended layers without harsh lines.
How twist-and-cut creates natural layers:
When you twist a section of hair before cutting, the twist creates a spiral. Hair on the outside of the spiral is slightly shorter than hair in the center once you release the twist. This automatic graduation gives you layers without having to cut multiple times. The tighter the twist, the more graduation you create.
Detailed twist-and-cut instructions:
- Section off the hair you want to layer (typically face-framing or side sections).
- Comb the section smooth and pull it away from your head at the desired angle—usually 45-90 degrees.
- Twist the section 3-4 times loosely. You’re not wringing it like a towel, just creating a gentle spiral.
- Slide your fingers down the twisted section to where you want to cut.
- Make small upward snips into the hair below your fingers using point cutting.
- Untwist and let the hair fall. You’ll see graduated layers.
Best scenarios for twist-and-cut:
- Creating face-framing pieces with soft edges
- Blending crown layers into longer sections
- Working with curly or wavy hair (the twist mimics natural curl patterns)
- When you want texture but not dramatic layers
The beauty of this technique is forgiveness. If your twist isn’t perfectly even or your cut line is slightly wobbly, the graduation hides imperfections. It’s much harder to create obvious mistakes with twist-and-cut compared to straight-across cutting.
Conclusion
Cutting a butterfly haircut at home can be a simple and rewarding experience when done with patience and the right technique. By following proper sectioning, using sharp scissors, and cutting gradually, you can achieve soft layers and beautiful volume without visiting a salon. Always start with small trims, check balance from all angles, and avoid rushing the process. Remember, practice improves results, and it’s better to cut less than too much. With careful steps and confidence, you can create a flattering butterfly haircut that looks fresh, stylish, and professional right from the comfort of your home.