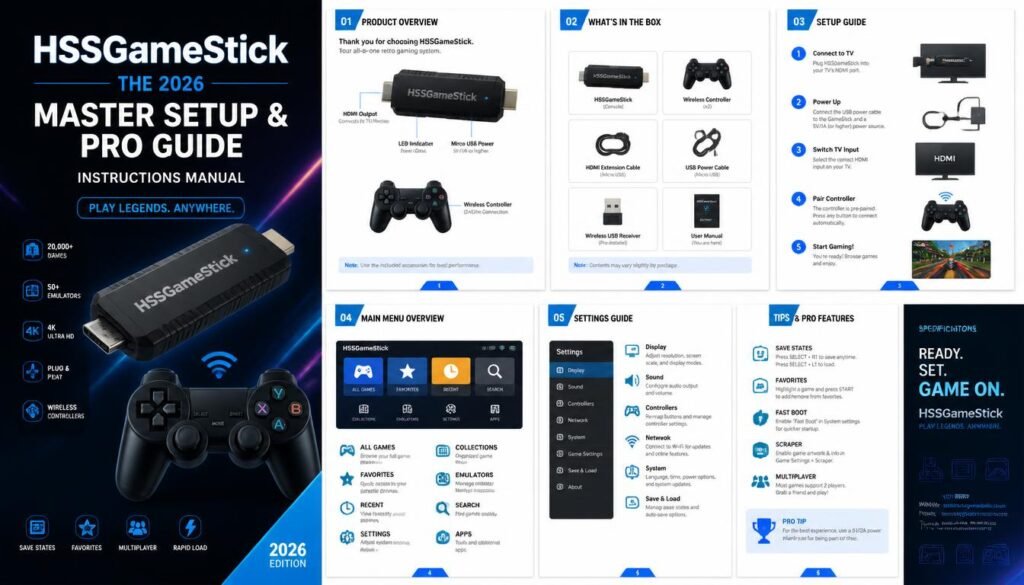

Mastering the Instructions Manual HSSGameStick: The 2026 Master Setup & Pro Guide is the first step toward unlocking a smooth retro-gaming experience. This device relies on specific hardware configurations to ensure your favorite classics run without lag or audio desync issues. By following these professional adjustments, you will turn a simple plug-and-play unit into a highly responsive console that feels native to your display.
Understanding how the system handles resolution and emulator core mapping is vital for any enthusiast. This guide focuses on the technical nuances that separate a casual session from a professional-grade setup. You will learn how to optimize your output, manage game saves, and customize the interface to suit your personal preferences perfectly.
Understanding the Core Hardware Architecture
The device operates on a modified Linux kernel designed to bridge the gap between legacy code and modern HDMI interfaces. At its heart, the system uses a low-power SoC (System on a Chip) that manages thousands of titles through emulation layers. Understanding this architecture is key because the Instructions Manual HSSGameStick highlights that hardware limitations dictate how many frames per second you can expect.
Unlike high-end gaming PCs, this stick relies on efficient software handshakes. When you boot the device, the kernel loads the primary UI first, which acts as a gateway to individual emulator cores.
These cores are responsible for interpreting the original machine code of 8-bit and 16-bit titles. If you notice stuttering, it is usually because a specific core is struggling with the overhead of the video upscaling process.
Effective cooling also plays a role in long-term stability. While the stick is small, the processor generates consistent heat during intensive 3D emulation.
Placing the device in a well-ventilated HDMI port is essential. If your TV is wall-mounted, consider using a short HDMI extension cable to move the stick away from the back panel, which often traps residual heat.
Initial Setup and Power Requirements
Getting started requires stable power delivery to avoid random reboots or corrupted save files. Most users make the mistake of using a standard television USB port for power. These ports rarely provide the consistent amperage required for the stick to maintain its peak performance during complex sequences.
Always use the dedicated power adapter included in the box or a high-quality wall block capable of at least 5V/2A output. A consistent power supply ensures that the internal flash memory remains stable during write operations. This is particularly important when you are saving your progress in a game, as a power dip during a write cycle can cause data loss.
Once powered, the initial boot sequence initializes the file system. Ensure your micro-SD card is seated correctly before plugging in the power cable.
If the device fails to detect the card, it will default to a minimal recovery screen or fail to launch the main menu entirely. If you encounter this, power down, reseat the card, and try again.
Optimizing Display and Resolution Settings
Modern 4K televisions often struggle to display low-resolution pixel art properly. The settings hssgamestick menu provides several options to scale the output to fit your screen. You should prioritize “Integer Scaling” if you want the sharpest possible image without blurring the pixel edges.
Integer scaling ensures that every original pixel is multiplied by a whole number, such as 2x or 3x. This prevents the “shimmering” effect that occurs when a display tries to map a non-integer pixel value. If you prefer a smoother look, you can enable bilinear filtering, though this often makes the image appear slightly soft or washed out.
Adjusting the aspect ratio is another crucial step for authentic gameplay. While “Stretch to Fill” is a common default, it distorts the original artistic intent of the developers.
Switch your display setting to 4:3 to maintain the intended proportions of your games. You can check the official W3C graphics standards for more information on how display scaling impacts visual fidelity across different hardware types.
Configuring Controller Inputs
Input latency is the silent enemy of retro gaming. When you first connect your wireless controllers, you might notice a slight delay between a button press and the on-screen action. You can mitigate this by adjusting the input polling rate within the advanced system menu.
Mapping your buttons correctly is equally important for a comfortable experience. The Instructions Manual HSSGameStick recommends a standard layout that mimics the original hardware as closely as possible. If you are playing a console that originally used a six-button layout, ensure your controller’s shoulder buttons are mapped to those secondary inputs.
For competitive games, disable any unnecessary overlays or background processes that might interfere with input polling. These background tasks consume CPU cycles that are better spent tracking your controller movements. If you use a wired controller, you will naturally eliminate the wireless interference that often causes dropped inputs in crowded environments.
Read More: Droven.io Review 2026: AI Knowledge & Automation Platform Explained
Managing Game Libraries and Storage
The device uses a specific directory structure on the SD card to organize your collection. Do not move files around outside of this structure, as the system indexer will fail to locate your games. If you choose to add your own titles, ensure they are placed in the correct subfolders corresponding to their platform.
File naming conventions are strict for the internal scanner to recognize your games. Use clean, simple names for your files and avoid special characters or long strings.
If the system fails to display a game, the metadata file might be corrupted. You can often fix this by deleting the local cache file and letting the system rebuild the library index on the next boot.
Consider the following table to compare storage performance impacts:
| Storage Type | Load Speed | Reliability |
|---|---|---|
| Class 10 MicroSD | Fast | High |
| UHS-I Card | Very Fast | Excellent |
| Generic SD Card | Slow/Stutter | Low |
Advanced Manual Settings and Emulation
For those who want to dig deeper, the manual settings provide access to frame skipping and audio synchronization. Frame skipping is a useful tool if a game is running too slowly, but it can make the action look jittery. Use it sparingly, only for titles that are otherwise unplayable due to heavy technical demands.
Audio synchronization is another area where minor adjustments make a big difference. If the sound effects are trailing behind the visuals, look for the “Audio Sync” toggle in the core configuration. Turning this on forces the emulator to drop audio frames to keep pace with the video, which is usually the desired outcome for rhythm or action games.
You can also experiment with shaders to give your games a nostalgic CRT look. Shaders simulate the scanlines and shadow masks of old televisions, which can soften the harsh look of pixel art on modern LED screens. While this adds a small amount of load to the processor, it is well worth the trade-off for the aesthetic improvement.
Troubleshooting Common Performance Issues
If your device freezes during a session, the first step is to perform a hard power cycle. Unplug the unit for at least thirty seconds to allow the capacitors to discharge completely. Most software-related hangs are caused by a temporary memory overflow, which a cold reboot clears out immediately.
Audio pops and crackles usually indicate a mismatch between the emulator’s output frequency and your TV’s input capacity. Check your audio settings to ensure the sample rate is set to 44.1kHz or 48kHz. If the issue persists, try connecting the audio through an external soundbar or receiver to bypass the television’s internal processing.
If you find that your save files are disappearing, check the integrity of your SD card. These cards have a finite number of write cycles, and they eventually degrade. If you notice consistent save errors, it is time to move your data to a new, high-quality card to prevent further loss.
Essential Maintenance and Best Practices
Keeping your system in top shape doesn’t require complex technical knowledge. Following a few simple routines will extend the lifespan of your hardware significantly. Always use the “Shutdown” option in the menu before cutting power; pulling the plug while the system is writing to the card is the fastest way to corrupt your data.
Here are a few maintenance tips to keep in mind:
- Always use a high-speed, reputable brand SD card to prevent data corruption.
- Keep the device clear of dust by using a compressed air canister on the HDMI port.
- Avoid leaving the device plugged into a power source when not in use for extended periods.
- Regularly back up your save files to a computer to ensure your progress is safe.
- Update your firmware only when a stable, official release is available from the manufacturer.
Finally, remember that this technology is designed for fun, not for pushing the limits of modern computing. If you find yourself constantly tweaking settings, take a break and actually play some games. The goal is to enjoy the experience, and sometimes the best configuration is the one that gets out of your way.
Frequently Asked Questions
Can I add my own games to the system?
Yes, you can add your own titles by placing them in the designated folders on your SD card. Ensure the files are in the correct format for the emulator to recognize them, and use simple file names to avoid indexing errors.
Why does my game feel laggy?
Game lag is usually caused by display settings or power issues. Ensure you are using a 5V/2A power adapter and that your TV is set to “Game Mode” to reduce input processing delays. If the issue persists, check if you have enabled intensive shaders that the processor cannot handle.
Is it safe to leave the device plugged in?
While the device is designed to be low-power, it is best practice to disconnect it or use a switched power strip when not in use. This protects the internal components from potential power surges and prevents unnecessary wear on the hardware.
What should I do if the screen is black?
A black screen often indicates a failure to initialize the video signal or a corrupted SD card. First, verify that your HDMI cable is secure and that the TV is on the correct input. If that fails, try reseating the SD card or testing the device on a different television.
How do I update the software?
Check the manufacturer’s website for official firmware updates. Follow their specific instructions carefully, as an interrupted update process can render the device unusable. Always create a backup of your SD card contents before attempting any system-level updates.
Concluding Thoughts on System Mastery
Successfully configuring your device is about balancing performance and authenticity. By following the steps in this Instructions Manual HSSGameStick, you have the tools to create a reliable and enjoyable retro-gaming environment. Small details like power stability, proper aspect ratios, and smart file management ensure your hardware works for you, not against you.
Do not be afraid to experiment with different cores or shaders to find the look and feel that resonates with your personal gaming style. If you ever hit a wall, remember that a clean reboot and a check of your power source solve the vast majority of common issues. Enjoy your collection and the classics you love.